Showing posts with label garden. Show all posts

Wednesday, June 19, 2013

Easy Garden Obelisk

Happy day to you…my friends.   It is time for another garden project.
This one has been germinating in my brain for weeks now and has finally come into bloom.
A garden trellis obelisk
obelisk1
Why do I call it easy???
Because unlike all the obelisk plans I found online this one has no angle cuts.
Since it is going in the garden and I plan on it being covered with something that climbs I did not care if edges matched up precisely or were perfectly mitered.
I wanted fast and easy…
Want to see how we built it?

 Click here to see the rest of this POST


signaturePamela

Tuesday, June 11, 2013

How I plant Iris

fiftyfifty

If you have read my posts lately you will know that I do not profess to follow the text book way of gardening.

Not at all..

I am lazy, find short cuts and just free wheel it.

Really..

So if you are wanting to follow standard rules of how and when to do things in the garden then I must warn you, you are in the wrong spot. Smile

My methods have been learned by first hand trial and error over the past 20 years in various climates, conditions and zones.

That being said, on with the show!

If you want reassurance that this method will work just take a quick peek of my latest Iris posts.

Each photo is a separate post filled with my Iris’

two tone burgundy Prince Edward560Starship Enterprise

Despite my disclaimer I am so glad you stayed,I love sharing my garden with you all.

My last post was about ‘how I dig up and separate my iris …’

I will say that the standard procedure for “when” to dig up and transplant your Iris is 6 to 8 weeks after bloom, but I do it anytime after the current blooms fade and are done for the season.

dig in

Have you dug up your iris, separated them, cleaned them up? (spraying the dirt off with a hose so you can see if there are  bugs or rot to cut out is optional)

You can plant what you want to keep right away or wait awhile.  They are not too fussy.

Share the extra rhizomes with your friends, they will love you forever.

Now find the keepers a fresh place in your garden…

  a spot that gets a good 6 hours of sun each day and has good drainage.

Iris can withstand drought but not soggy feet.

DSC_0010

Here is my spot (nothing special here)

DSC_0011

Sprinkle on a tablespoon or so of Bone Meal to help them along

DSC_0012

Stir the bone meal up in the dirt, mixing it in lightly

trio

Now you can plant just one rhizome.

OR

if you wish a batch of one color in an area here's the trick.

Plant three with the pointy nose of the rhizomes facing each other in a sort of circle.  Spacing is not critical but I place mine about 3 inches apart.

Water them in and keep them watered through the summer, not soggy though.

Do not bury deep.

Iris like to be close to the surface. I leave a bit of the tops showing when I plant, that way I know they are not too deep. 

In cold, cold climates do mulch a bit before hard cold starts but be sure and rake it back as soon as warmer weather begins. 


DSC_0024

And one day next Spring, you will have some fresh Iris blooms to enjoy, and if they take a bit longer it will be the following season.  All the sweeter for the wait.

I hope this helps all those out there that were skittish about digging up and dividing your overcrowded Iris.

It really is this simple.

Until next time! Ta…

signaturePamela

here is another side note:  My garden soil has been amended over the past 15 years with chicken manure and compost so it drains well, is crumbly and great for planting in. 

The best thing you can do for your plants is feed the soil.  That is different than feeding your plants.

Pink Saturday, Tatertots and Jello, Metamorphosis Monday, The Sunday Showcase, Crafto-Maniac, Inspire Me Tuesday

Monday, May 13, 2013

Cheap and Easy Cedar Fence Board Planters

DIY fence board planters7

Have you got a bare spot you want to gussy up?
 
My back deck rails were less than pretty and I want to see cascading flowers when I look out my kitchen window.  (pretend the flowers are all filled in and cascading down hiding a good portion of the pickets and the view of the neighbors back roof)

My fix…. cheapo DIY planters made from cedar fence boards.

1.  Buy some cedar fence boards, I went with two 6 inch wide x 6 feet long and one 8 inch wide, and some scrap wood to make the ends.  (note: They are called 6 inch and 8 inch wide but in actuality they are 5.5 and 7.5 inches wide)

DIY fence board planters1 The 6 inch boards $2+ and the 8 inch were $3.50+

2. Square off the dog eared end and dry fit the boards.  Fence boards are willy nilly and do not always match in width or length.  So you have to make them match with your trusty tape measure and saw.

DIY fence board planters2

Or just line them up and then view and mark how much to cut off.

DIY fence board planters3

3. I put the end piece on first, used just scrap pieces of wood I had on hand.  I applied wood glue before nailing.  Actually this is a photo of me putting on the last side but it does show my end piece is just scrap and the generosity of Titebond glue. Smile 

 I started out with my brad nailer but it jammed so I fell back on a good ol’ hammer and finish nails.  A wee bit slower but still quite effective.

DIY fence board planters4

4.  Screw to deck rail so the pesky raccoons will not knock your wonderfully roomy planter to the ground below.  Here I am letting the glue dry before filling.  Be sure to drill holds for proper drainage, I drilled mine towards the back of the planter where it hangs off the deck rail.

fence board planters 5

5.  I gave them 24 hours to dry then I had fun planting them up.  I left them unpainted or stained, I want these to weather naturally to a soft grey, that will not take long at all.

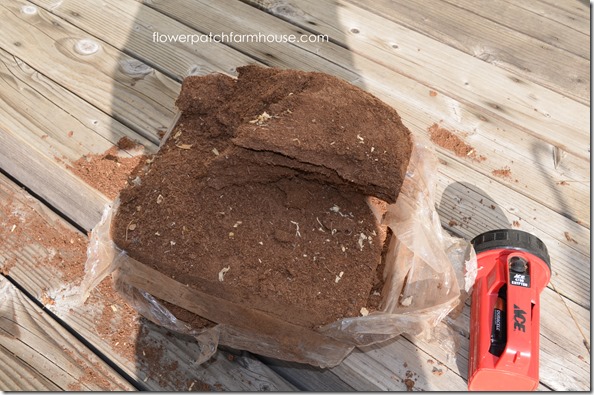
6. Mix up some coconut coir into your potting mix for added water retention.  It is natural, sustainable and easy to work with. You can purchase Coconut Coir in bales or bricks, a little goes a LOOOONG way as it is compressed. 

DSC_0012

First I must soak the coconut coir for a good few hours, make sure you have plenty of room in your bucket, this stuff really expands as it soaks up the water.  I mix it maybe a quarter or third of coconut coir to 3/4 or 2/3 potting mix. 

DSC_0013

7. Fill you fantabulous planters with the potting/coconut coir mix and plant all your cascading flowers, give them room to fill in. 

DIY fence board planters6

We have Purple Wave Petunias, Trailing Lobelia and a wee bit of white alyssum.   I will be sure to share once it is filled to overflowing with flowers. 

These were cheap and easy to make,  I had the wood glue and finish nails on hand, for a total on the rest of the supplies it may have ran me about $8 per planter and they are a good size to fit plenty of flowers, 6 feet long by 7.5 inches wide.  If you wanted you could also just slip in some 4 inch pots instead of putting the soil in the boxes.  The height of the sides is just right to hide the pots and you could easily change out the flowers is you wished.

So there you have it, quick and easy planters.

Now off to photo what is blooming this fine Monday morning in my garden.   I will share that tomorrow, I do hope.

Pamela

Tuesday, April 23, 2013

Layering for propagating Wisteria, Japanese Maples etc

wisteriablog
 
 I love plants.
 
I love free or nearly free plants even better. 
 
I find it enjoyable to learn how to propagate (unpatented) plants to expand my garden so I am constantly reading garden magazine, websites and blogs. I test out the techniques in my own garden.
 
Growing from seed is a wonderful way to start annuals and some perennials but some perennials can take years and years to bloom from seed. 
 
 
 This post is on how to Air Layer and Ground Layering to get new plants from plants like wisteria and Japanese maples (these are just two examples, this method can be used for enumerable plants)
 
 Definition of layering: Layering is a propagation method that encourages new roots to form on branches still attached to the parent plant. The parent supplies the layer ― the new plant ― with water and nutrients during the rooting process.
 
First I will show Air Layering.  Air layering is most successful when the plant is actively growing, like now in Spring and Summer.

Step 1: Gather your Materials
DSC_0002
 
 A sharp knife
 
Something to tie with, I use old pantyhose cut in strips.
 
A planting medium that retains moisture well, like sphagnum moss, coconut coir, or I use potting soil mixed with perlite.
 
A form of plastic to wrap with. I used a produce bag cut open and in half.
Rooting medium (not shown)
 
The Parent Plant below, a lovely wisteria with fresh new growth.
 
DSC_0003
 
Step 2:  Wound the plant
 
With a sharp knife, make two parallel cuts about 1 1/2 inches apart around the stem and through the bark and cambium layer. Connect the two parallel cuts with one long cut and remove the ring of bark leaving the inner woody tissue exposed.
Some say when you cut thru the bark and scrape it back you expose enough of the layer below the cambium to be successful in rooting.
 
DSC_0004
 
Step 3: Tie on bag
 
Below the wound, tie on the piece of plastic.  You will be creating a pocket with it.
Pretty, it is not but it gets the job done.
 
DSC_0006
 
Step 4: Fill pocket.
 
With one hand kind of wrap the plastic around the wound and hold while filling with the soil (moss, coir) in the pocket create, make sure it surrounds the wound.
 
DSC_0008
 
Step 5: Moisten soil
 
Pour water into the pocket of soil to moisten thoroughly
(you can pre-moisten the planting medium (soaking the moss for several hours is recommended if you use that or the coir) and maybe next time I will be sure the pre-moisten my mix too, I think it may work better.)
 
DSC_0009 
 
Step 6: Close up plastic
Once you have the soil mix well moistened close up the pocket made of plastic and tie above the wound.  To make sure there was good contact with the moist soil and the would I tied another strip around the middle of the pocket.  I made sure to tie the branch to the trellis, the pocket of soil adds weight.
 
DSC_0006
 
Step 7: Shield
 
Finally, wrap with foil to block direct sun from over heating the pocket.  It may take months for roots to form but keep checking on the moisture level of the soil mix for the duration, it is best not to let it dry out.  Check after a few months to see if the wound callused over, if it has it will not produce roots.  If it forms a callus it means the cambium layer was not peeled back  enough to expose the inner wood.
Here is a link to an excellent YouTube video of air layering. 
 
 
Soon I will do a post on Ground Layering.
Happy Growing!
sp02-bst
signaturePamela


Thursday, April 18, 2013

Rooting Lilacs and roses aka: Semi softwood cuttings

This is a reprint of an old blog post I did in 2011 for those of you that missed it the first time, it compliments my last post on propagating Pelargoniums aka: soft wood cuttings.  And the title of this post should say Semi HARD wood cuttings not soft.  An off moment there..

 Awhile back I stated I would do a post of how I root cuttings. I have a neighbor that has an old lilac bush that she was told is called a 49’er Lilac. It supposedly came West with the 49’ers in the Gold Rush. (or it’s parent did) I have admired this Lilac for the 13 years I have lived in my little cottage. In the spring I will sit on my front garden step and wait for the lilac fragrance to drift my way on the morning breeze and delight my senses. Here is a few blossoms I trimmed from it this year.

DSC_0004

I prepare my propagation box. I use a wine crate and fill with my own mixture of 2 parts compost (I get this from a local company that composts garden debris on a huge scale, it is similar to potting soil you buy at a garden center), 1 part perlite and 1 part sand (I am sure there are better mixtures but I used what I had on hand and I have had success with this in the past).

I have recently read that play sand can contain salt and may not be a good one to use, sharp sand is reputed to be superior for this use.

The crate has slats on the bottom but there are wide gaps between the slats so this drains very well. I have it sitting on the gravel floor of my greenhouse in an area that direct sunlight will not hit but it still gets plenty of bright light. I will fill the box more with my potting mix until it is nearly full.

plantingboxbetter

I will use this fish tank as my cover to create a small greenhouse effect.

fishtank2

Now back out to the Lilac to get the cuttings.

I choose the new growth I want to cut from and choose some about 8 to 12 inches long.

lilaccutting

I take quite a few cuttings, the more I try to root the better my chances are of getting some to actually grow for me. I know I may lose some to fungus or who knows what. I had to wait for the right time to take cuttings (or so I have read) and this is the right time for this type (semi-hardwood).
I haul them all to my greenhouse and begin. First I strip most of the leaves from the cutting. I dip the ends into the rooting medium.

Now this medium I have had for awhile and it says it only has a years shelf life but I have kept it in the refrigerator to extend that shelf life so I hope it is still potent enough to do the job. I should invest in some fresh stuff soon.

rootingmedium

I have a small paint brush in the jar as well. The jar is not deep enough to cover all of the stem I need to be covered with the medium so I use the little paint brush to finish the job.

cuttinginmedium

See the nodes on the stem, that is wear roots begin and I want a good portion of nodes below the potting soil.

cutting

I also take some rose cuttings for the hey of it. I normally like the roses to be a bit more hardened off than they are now, like later on in the Fall. I have had more success that way, these softer cuttings while the bushes are blooming succumb to fungus more often than the later cut ones but I thought I would give it a go just for the fun of it.

cuttingsrose

Now that they are all dipped and thoroughly coated with the rooting gel I stick them in the potting soil mixture.

cuttingsindirt

I place the far enough apart they do not touch each other and away from the edges so they will not touch the glass of the cover. I should take off more leaves, the leaves tend to be where the fungus starts but for photo purposes I will leave them on, easier to see where the cuttings are. After placing all the cuttings in the box I carefully set the cover over them.
 
cuttingsinbox

You can see there is room around the fish tank where the potting soil shows and that is how I water this without having to lift the tank. You don’t want the soil very wet just damp, if it is too wet you drown the poor cutting or encourage the fungus.  Also prop up the tank a bit to let air flow in.


cuttingsinboxside

And here is the results …a lovely new rose from a cutting..

kirstenrose
 
A lovely lilac…I think it takes 3 years for them to bloom.   We shall see.

[DSC_0003-001%255B5%255D.jpg]

I have just read up on a new (to me) way of rooting semi softwood cuttings.  I am going to give it a whirl and report in with the results in a few months.

Happy Planting.
signaturePamela


ff By Stephanie Lynn  It's Overflowing
Related Posts Plugin for WordPress, Blogger...