This is a reprint of an old blog post I did in 2011 for those of you that missed it the first time, it compliments my last post on propagating Pelargoniums aka: soft wood cuttings. And the title of this post should say Semi HARD wood cuttings not soft. An off moment there..
Awhile back I stated I would do a post of how I root cuttings. I have a neighbor that has an old lilac bush that she was told is called a 49’er Lilac. It supposedly came West with the 49’ers in the Gold Rush. (or it’s parent did) I have admired this Lilac for the 13 years I have lived in my little cottage. In the spring I will sit on my front garden step and wait for the lilac fragrance to drift my way on the morning breeze and delight my senses. Here is a few blossoms I trimmed from it this year.
 I prepare my propagation box. I use a wine crate and fill with my own mixture of 2 parts compost (I get this from a local company that composts garden debris on a huge scale, it is similar to potting soil you buy at a garden center), 1 part perlite and 1 part sand (I am sure there are better mixtures but I used what I had on hand and I have had success with this in the past).
I have recently read that play sand can contain salt and may not be a good one to use, sharp sand is reputed to be superior for this use.
I prepare my propagation box. I use a wine crate and fill with my own mixture of 2 parts compost (I get this from a local company that composts garden debris on a huge scale, it is similar to potting soil you buy at a garden center), 1 part perlite and 1 part sand (I am sure there are better mixtures but I used what I had on hand and I have had success with this in the past).
I have recently read that play sand can contain salt and may not be a good one to use, sharp sand is reputed to be superior for this use.
The crate has slats on the bottom but there are wide gaps between the slats so this drains very well. I have it sitting on the gravel floor of my greenhouse in an area that direct sunlight will not hit but it still gets plenty of bright light. I will fill the box more with my potting mix until it is nearly full.
 I will use this fish tank as my cover to create a small greenhouse effect.
 Now back out to the Lilac to get the cuttings.
I choose the new growth I want to cut from and choose some about 8 to 12 inches long.
Now back out to the Lilac to get the cuttings.
I choose the new growth I want to cut from and choose some about 8 to 12 inches long.
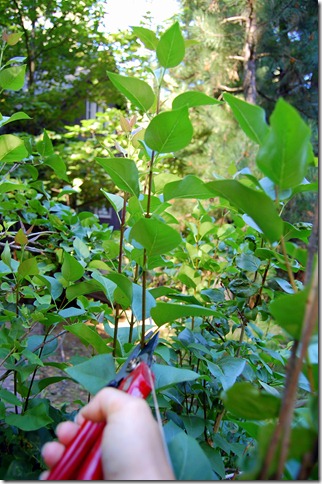 I take quite a few cuttings, the more I try to root the better my chances are of getting some to actually grow for me. I know I may lose some to fungus or who knows what. I had to wait for the right time to take cuttings (or so I have read) and this is the right time for this type (semi-hardwood).
I haul them all to my greenhouse and begin. First I strip most of the leaves from the cutting. I dip the ends into the rooting medium.
I take quite a few cuttings, the more I try to root the better my chances are of getting some to actually grow for me. I know I may lose some to fungus or who knows what. I had to wait for the right time to take cuttings (or so I have read) and this is the right time for this type (semi-hardwood).
I haul them all to my greenhouse and begin. First I strip most of the leaves from the cutting. I dip the ends into the rooting medium.
Now this medium I have had for awhile and it says it only has a years shelf life but I have kept it in the refrigerator to extend that shelf life so I hope it is still potent enough to do the job. I should invest in some fresh stuff soon.
 I have a small paint brush in the jar as well. The jar is not deep enough to cover all of the stem I need to be covered with the medium so I use the little paint brush to finish the job.
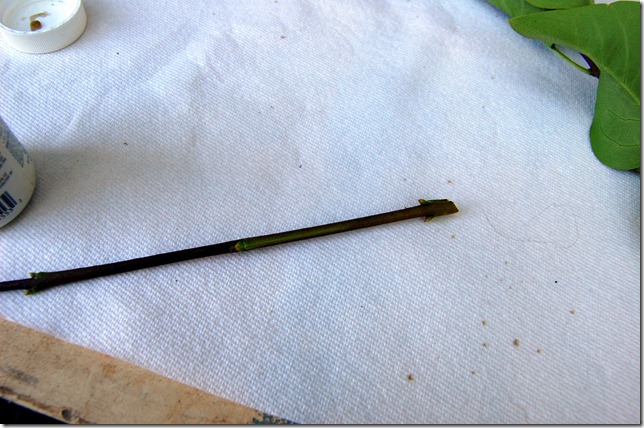
 See the nodes on the stem, that is wear roots begin and I want a good portion of nodes below the potting soil.
 I also take some rose cuttings for the hey of it. I normally like the roses to be a bit more hardened off than they are now, like later on in the Fall. I have had more success that way, these softer cuttings while the bushes are blooming succumb to fungus more often than the later cut ones but I thought I would give it a go just for the fun of it.
 Now that they are all dipped and thoroughly coated with the rooting gel I stick them in the potting soil mixture.
 I place the far enough apart they do not touch each other and away from the edges so they will not touch the glass of the cover. I should take off more leaves, the leaves tend to be where the fungus starts but for photo purposes I will leave them on, easier to see where the cuttings are. After placing all the cuttings in the box I carefully set the cover over them.
 You can see there is room around the fish tank where the potting soil shows and that is how I water this without having to lift the tank. You don’t want the soil very wet just damp, if it is too wet you drown the poor cutting or encourage the fungus. Also prop up the tank a bit to let air flow in.
 And here is the results …a lovely new rose from a cutting..
 A lovely lilac…I think it takes 3 years for them to bloom. We shall see.
![[DSC_0003-001%255B5%255D.jpg]](https://blogger.googleusercontent.com/img/b/R29vZ2xl/AVvXsEgeIJOLJpogSJMJSIuN8QPb9tMAlg1o8rrLfiFriC2cbDQ79hiWADptuajUi1uaKug26y4cwBoDoM-RFDdyWVx65v0u0Fb5JG2cdNIcoZCy9cgDYQHSOIrIikWHYcTyloMtHcu4s0STROA/s1600/DSC_0003-001%25255B5%25255D.jpg) I have just read up on a new (to me) way of rooting semi softwood cuttings. I am going to give it a whirl and report in with the results in a few months.
Happy Planting.
I have just read up on a new (to me) way of rooting semi softwood cuttings. I am going to give it a whirl and report in with the results in a few months.
Happy Planting.







Awhile back I stated I would do a post of how I root cuttings. I have a neighbor that has an old lilac bush that she was told is called a 49’er Lilac. It supposedly came West with the 49’ers in the Gold Rush. (or it’s parent did) I have admired this Lilac for the 13 years I have lived in my little cottage. In the spring I will sit on my front garden step and wait for the lilac fragrance to drift my way on the morning breeze and delight my senses. Here is a few blossoms I trimmed from it this year.
This year the late snows wreaked havoc on the poor old thing. We had late May heavy snow…you may remember this post I did…Depressed Tulips.
This Lilac has been neglected for years, the house has been either rented to folks who care not for yard work or sitting empty (as it is now) But the owner is now having the entire house remodeled and is getting ready to move into it herself and will revamp the yard and gardens ASAP. This poor thing will get the TLC it deserves…I hope.
 In the meantime the owner has given me permission to get cuttings from it…there are also lots of suckers coming up at the base and I would like to read up on digging one or two up and trying to get those growing in pots.
But first, on with the cuttings…
I prepare my propagation box. I use a wine crate and fill with my own mixture of 2 parts compost, 1 part perlite and 1 part sand (I am sure there are better mixtures but I used what I had on hand and I have had success with this in the past).
The crate has slats on the bottom but there are wide gaps between the slats so this drains very well. I have it sitting on the gravel floor of my greenhouse in an area that direct sunlight will not hit but it still gets plenty of bright light. I will fill the box more with my potting mix until it is nearly full.
I will use this fish tank as my cover to create a small greenhouse effect.
Now back out to the Lilac to get the cuttings.
I choose the new growth I want to cut from and choose some about 8 to 12 inches long.
I take quite a few cuttings, the more I try to root the better my chances are of getting some to actually grow for me. I know I may lose some to fungus or who knows what. I had to wait for the right time to take cuttings (or so I have read) and this is the right time for this type (semi-hardwood).
I haul them all to my greenhouse and begin. First I strip most of the leaves from the cutting. I dip the ends into the rooting medium.
Now this medium I have had for awhile and it says it only has a years shelf life but I have kept it in the refrigerator to extend that shelf life so I hope it is still potent enough to do the job. I should invest in some fresh stuff soon.
I have a small paint brush in the jar as well. The jar is not deep enough to cover all of the stem I need to be covered with the medium so I use the little paint brush to finish the job.
See the nodes on the stem, that is wear roots begin and I want a good portion of nodes below the potting soil.
I also take some rose cuttings for the hey of it. I normally like the roses to be a bit more hardened off than they are now, like later on in the Fall. I have had more success that way, these softer cuttings while the bushes are blooming succumb to fungus more often than the later cut ones but I thought I would give it a go just for the fun of it. There is also a dark purple Lilac in another neighbors yard that I want to get cuttings from but I have yet to speak to them and ask permission to do so.
Now that they are all dipped and thoroughly coated with the rooting gel I stick them in the potting soil mixture.
I place the far enough apart they do not touch each other and away from the edges so they will not touch the glass of the cover. I should take off more leaves, the leaves tend to be where the fungus starts but for photo purposes I will leave them on, easier to see where the cuttings are. After placing all the cuttings in the box I carefully set the cover over them.
You can see there is room around the fish tank where the potting soil shows and that is how I water this without having to lift the tank. You don’t want the soil very wet just damp, if it is too wet you drown the poor cutting or encourage the fungus.
This is my first shot at rooting Lilacs so let’s see how we do. I have read it takes about 3 weeks for roots to develop so I will mark the date of 7-26-2011 and post a note in my computer to pop up when 3 weeks is up so I can check to see if there are roots.
In my past efforts to root roses it has taken much longer but then again I take later cuttings that are harder so that most likely has something to do with it.
Check back in to find out my results!
In the meantime the owner has given me permission to get cuttings from it…there are also lots of suckers coming up at the base and I would like to read up on digging one or two up and trying to get those growing in pots.
But first, on with the cuttings…
I prepare my propagation box. I use a wine crate and fill with my own mixture of 2 parts compost, 1 part perlite and 1 part sand (I am sure there are better mixtures but I used what I had on hand and I have had success with this in the past).
The crate has slats on the bottom but there are wide gaps between the slats so this drains very well. I have it sitting on the gravel floor of my greenhouse in an area that direct sunlight will not hit but it still gets plenty of bright light. I will fill the box more with my potting mix until it is nearly full.
I will use this fish tank as my cover to create a small greenhouse effect.
Now back out to the Lilac to get the cuttings.
I choose the new growth I want to cut from and choose some about 8 to 12 inches long.
I take quite a few cuttings, the more I try to root the better my chances are of getting some to actually grow for me. I know I may lose some to fungus or who knows what. I had to wait for the right time to take cuttings (or so I have read) and this is the right time for this type (semi-hardwood).
I haul them all to my greenhouse and begin. First I strip most of the leaves from the cutting. I dip the ends into the rooting medium.
Now this medium I have had for awhile and it says it only has a years shelf life but I have kept it in the refrigerator to extend that shelf life so I hope it is still potent enough to do the job. I should invest in some fresh stuff soon.
I have a small paint brush in the jar as well. The jar is not deep enough to cover all of the stem I need to be covered with the medium so I use the little paint brush to finish the job.
See the nodes on the stem, that is wear roots begin and I want a good portion of nodes below the potting soil.
I also take some rose cuttings for the hey of it. I normally like the roses to be a bit more hardened off than they are now, like later on in the Fall. I have had more success that way, these softer cuttings while the bushes are blooming succumb to fungus more often than the later cut ones but I thought I would give it a go just for the fun of it. There is also a dark purple Lilac in another neighbors yard that I want to get cuttings from but I have yet to speak to them and ask permission to do so.
Now that they are all dipped and thoroughly coated with the rooting gel I stick them in the potting soil mixture.
I place the far enough apart they do not touch each other and away from the edges so they will not touch the glass of the cover. I should take off more leaves, the leaves tend to be where the fungus starts but for photo purposes I will leave them on, easier to see where the cuttings are. After placing all the cuttings in the box I carefully set the cover over them.
You can see there is room around the fish tank where the potting soil shows and that is how I water this without having to lift the tank. You don’t want the soil very wet just damp, if it is too wet you drown the poor cutting or encourage the fungus.
This is my first shot at rooting Lilacs so let’s see how we do. I have read it takes about 3 weeks for roots to develop so I will mark the date of 7-26-2011 and post a note in my computer to pop up when 3 weeks is up so I can check to see if there are roots.
In my past efforts to root roses it has taken much longer but then again I take later cuttings that are harder so that most likely has something to do with it.
Check back in to find out my results!


"/>